Posts

Showing posts from 2009

Elevate shelves with old yoghurt tubs

Image
We live in the hot but humid tropics so stuff in the house tend to get mouldy easily, especially the 3-tier shelve units that we stacked up to make a sideboard. The construction site opposite our place makes it doubly dusty so we have to sweep and mop very often, and the fact that these shelves are in direct contact with the floor is just not helping. The only short term solution (besides moving to another country which is not happening in the near future, bah...) is to give the shelves legs to elevate them from the floor surface. I've been collecting a lot of Sunglo Sour Cream and Sunglo Yoghurt tubs - mainly for freezing stock and storing leftover food in the fridge - which are rather tough. So I scraped the paint off the tub label and stacked them under the shelf units, and this is how the sideboard looks now: I've done the same to the book shelves in the study, hoping that they would not getting mouldy so easily. Whilst achieving the purpose of elevating these shelves off t

Beaded tiara headband for kids

Image
My nieces, like all other young girls, love everything about princess. Last Christmas, I made them tiara party hats out of old Christmas cards and sequins I took off a free handbag (which I've turned into a multi-compartment handbag ). Since I have some leftover beads which are not enough for anything extensive, I thought I could make them some beaded tiaras. I've used only fishing lines as I haven't any steel wire, and buying some just for that is going to defeat the purpose of using up existing material. Fishing lines are soft and flexible so they can't be worn like commercial tiaras. However, they turned out to be dual-purpose: 1. to be worn as a headband, and 2. as a necklace. Perhaps I can make up stories about some fairy princesses whose tiaras can turn into magical necklaces that give them power, and I think the girls would like that.

Drawstring bag from excess fabric

Image
My habit of saving up stuff and trying to make them useful traces all the way back to my teenage. This is my first handmade bag, made using the excess fabric from my blouse. My mum and her sisters were tailors so they used to make all my clothes and I learned stitching and operating the sewing machine by watching them work. I didn't do this all by myself, of course. One of my aunties helped me with the more complicated bits. And we'd a sewing machine then so it was not exactly hard for a 16-year-old. More than 2 decades on later, this bag is still in good condition although it might be a little too small and girly for me now. I can always give it to my nieces, or use it as a gift packaging... well I'll make sure it's put to good use. Note (21 Feb 2010) On 14 February 2010, first day of Lunar New Year - my youngest niece used this for collecting her red packets, and I let her keep it as she loves it so much - it's just the right colour for her!

DIY Christmassy Purple Beaded Napkin Rings

Image
Since the last bunch of beaded napkin rings , I've gone a little obsessed with napkin rings and have made another set with different coloured beads and design. I managed to make 5 with the leftover beads from making my choker necklace and a beaded belt. I think they look really good with my mostly white table setting and crockeries. Unlike the turquoise napkin rings , these ones have a slightly more complicated design so it took me almost 2 evenings to complete. Here is the step-by-step process in illustration: 1. I use a 0.35 nylon fishing thread (that's what I have in my drawer), but you can use a thinner one as the napkin rings are only small. I measure it to about 1.1m for each napkin ring. It's always best to use 1 whole thread for each, to save rejoining work halfway through. Start with the beads in the middle of the thread and criss-cross to make shapes: 2. Here's to complete the first circle and move on to the next row (then repeat for the row after that): 3. T

Eco Friendly Handmade foldable 2-D Christmas tree

Image
Last year we made a Christmas tree out of used A4 and A3 paper with tapioca starch glue, but unfortunately we don't have the space to store it away as it can't be folded down flat except the legs. So we had to dismantle the tree and send the paper for recycling. However, the cardboard baubles, the foil star and the tree legs are saved. So this year I thought we'd better have something that can be folded flat and stored away when the season is over, so that we can probably reuse it next year. There are always some ends and leftover of cardboard packaging box lying around which can't be use for anything specific. So here is what I did: Cut them into 1.5-inch strips and glue each pair into a 90-degree L shape. Join them up with a fishing line and some old beads (from a pair of broken old shoes before disposing them, as well as from my other beading projects) between every 2 L shapes. The foil star from last year's tree is sewed on to the top followed by a knotted loop

Creating storage compartments from excessive packaging

Image
We all shop. For essential needs or for leisure, we just can't avoid shopping in this new era of humankind. What annoys me is the excessive packaging, especially the unnecessary and over use of disposable containers in food industry. I notice that not only when you have takeaway, but even when you dine out at certain food outlets, they serve you sauces and/or drinks in disposable plastic or worse, styrofoam containers. I'm not sure how many countries practise that, but at least in Asia this is extremely common. I suppose using disposable is much cheaper than hiring someone to do the washing up. Due to my nature of a hoarder, I have over the years, collected a number of these plastic tubs. I knew [ahem] they would come in handy one day. So when I needed to sort my beads in various colours and types, I found these sauce tubs really useful. I can see the size and colour of the beads, and I can stack them neatly in my craft drawers. When I ran out of the tubs, I simply cut some of

Handmade Turquoise Beaded Napkin Rings

Image
Last year, we had some disposable napkin rings made out of old Christmas cards. This year, since there are still plenty of beads left from my handbag project , I thought I'd make some permanent ones from the leftover beads. I've tried a very simple and basic weaving pattern, and it took me less than 3 hours to complete this set of 4. And I managed to use up all but 2 of the turquoise beads from the handbag project . The white beads are leftover from the beaded bracelet . More clutter cleared this Christmas! For weaving instruction please see handmade beaded handbag .

Handmade beaded pearly bracelet

Image
I have a dress with some lovely beads sewn on the front, but they started to come off after several wash (although I only do hand washing because we don't have a washing machine). I've tried sewing them back on but some beads have gone missing so I had to take them all off and kept them with my stash of beads collection for future use. After a few drafts and drawings on the back of some old receipts (yep I use them as note pads), and a couple of trials and errors, I made myself a new pearly bracelet out of those fallen beads from my dress. This one is a slip-on with no hooks or buckles so it's really convenient, and just in time for Christmas!

DIY Festive napkin rings

Image
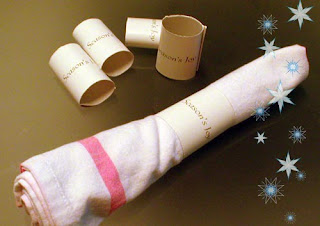
Last Christmas was the first time we ever had guests for dinner. So apart from the tree and pressies, I wanted to give the table a festive feel too, without having to spend too much or creating too much waste. My sister once brought over a stack of old season's greetings cards from the company she used to work for. Those cards were unused but just out of date. I can't send them to anyone as they had the company's logo on. So I cut the covers to make tiaras for my nieces (forgot to take some pictures of those), but we still had some left overs. So I tore the inside of the cards where the greeting message is, into long strips (by pressing a steel ruler over it). I then rolled them up and secure the ends with double sided tapes, and I got ourselves some rustic looking DIY disposable napkin rings!

Make your own multi-compartment handbag

Image
My hoarder nature has lead me to collecting all sorts of bags: free bags from magazines, complimentary bags from merchants, reusable shopping bags, shoe bags, etc. I do use some of them for my food shopping, but one can only carry so many bags so a lot of these bags end up hibernating in the cabinet. Since my last multi-compartment handbag announced its death, I have yet to find one that looks decent and serves up to my expectation of a handbag. Whilst waiting for Bag O Mr. Right to turn up, I've been using some of these free shopping bags, but there is one problem: they all don't come with any compartments. I thought maybe I could create something out of what I have in the house. These are what I used: A good sized black shopping bag I received free from a magazine about 5 years ago (I took off all the sequins on the bag to keep for future craft use) A small black M)phosis (a clothing label in Asia) shopping bag 1 of the 2 non-woven black shoe bags that came with a pair of sho

Handmade beaded choker necklaces

Image
I love chokers but I can never find anything I like that would fit nicely on my skinny bony neck. That's when I started buying colourful beads in small packages and having a go at making my own beaded jewellery. Here are 2 of my early attempts that cost me less than £2 in total, but I have worn each of them to many parties and concerts, and am still not sick of them yet. I wear them with dresses to more formal functions but I can also match them with jeans or casual wear on a day out. I've also made some bracelets and belts out of my beads projects.

Renewed apron

Image
It took me a long time to find an apron which I'm willing to buy. But it is still far from perfect: it's got a PVC lining which makes cooking really hot, especially in this tropical country. And it's also difficult to wash. So I decided to cut off the PVC layer (which I then used to pack something to send in the post). Then I thought it looks really to dark and dull in the kitchen, that it needs some livening up. I took some leftover embroidered border I've got for years, sewed them on to the top of the apron and the pocket (B). I then cut several embroidered flowers (B) off the remaining border and sewed them on the apron, each with a purple bead (from my existing craft box) over it. Ta da. A "new" apron I'm in no hurry to replace.

Handmade pot holder

Image
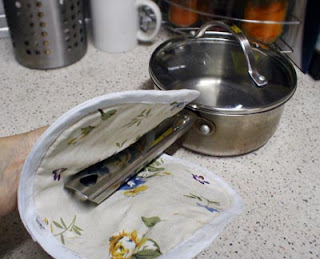
Here is a pot holder made from a pair of fridge door handle protectors. I once bought this pair that don't fit the fridge door handles properly (that's why I don't like buying ready made stuff because they never seem to fit!). So I took off the velcro strips (been kept for future use), place the two flat piece back to back, sandwiched with a piece of fabric cut out from an old T-shirt (to make it thicker) and iron them together with some Wundeweb. Really handy for holding hot pots. I didn't spend anything extra on this, and I turned my frustration on buying something unfit to great satisfaction! It can be used to line hot dishes over the worktop too.

Handmade hanging flower pot holder

Image
Some leftover from a ball of parcel string bought in 2003 is finally put to good use when I made these 2 flower pot holders. Our tiny balcony is running out of space for all our plants, and these crawly babies were twirled around some old disposable chopsticks stuck in the pot. They didn't look very healthy then. Since there are some pre-existing nails on the ceiling (probably fixed by the previous tenant to put up blinds), we thought that a hanging garden would be good for their new home. True enough, they now look really happy with their vines hanging down freely from the pots.

Hand sewn placemats from dress

Image
The problem with the commercialised world that we live in is that we don't actually get to find what we really want. They say that capitalism is consumer-centric but it's untrue. I've spent months looking for some decent looking placemats with simple design for our dinning table but all I could find are either bad quality placemats, often with horrible pictures on, unless I'm willing to pay through my nose for something that I'm gonna have food and wine spilled on all the time. I finally found an old set in a junk store that is really, really cheap, except there are some yellow stains on the corners. But the orangey stripes over white background looks very nice and simple and I thought I could do something about the stains. I had them cleaned, trimmed the yellow bits away by cutting them into smaller rectangles (we have a pretty tiny dining table anyway). I have a Laura Ashley denim dress I bought second hand off Ebay (for £1.50!) which is a little too long for me,

Hand-stitched curtains

Image
The previous tenant left behind some very illogical blinds in our bedroom: one side shorter than the other. This left an uncovered corner which allows strong sunlight coming in at 7am which makes the room really hot. We can't even have a lie in on weekends and waking up to bright light gives me migraine for days. The flat came as it is and we're not allowed to incur any unnecessary cost to the landlord and we really don't feel like spending money on replacing some blinds that are still good. So I thought of putting some curtains over it to screen off the sunlight whilst softening the mood of the bedroom.I tried looking for some simple, plain coloured ready made curtains to go with the window size. Unfortunately, the simple-looking home decor market in Malaysia seems to be catered for very rich people only. So I gave up and went to look for fabric in a fabric store instead. Lucky for me, I found some a plain off-white thick material and a chiffon-like material with pretty fl

How to make picture frames from excessive packaging

Image
We all like some nice pictures to hang on the walls to make our homes more cosy. The problem is: we're renting at the moment and landlords here are very particular about putting nails on their walls, and we don't really fancy spending so much money on picture frames (mind you, they are expensive and cheesy-looking). I've been toying with the idea of making my own frames using as much of existing material at home as possible, and they have to be quite light so that I can perhaps stick them on with some Blu-Tack. This way I can remove them and not leave any unsightly holes on the walls. But finding the right material and to come up with a solution aren't easy, and I'm just too anal about my own decisions. Came last Christmas, my sister in law gave me something that came in 2 pieces of thick styrofoam. I then found some old black sugar paper which I collected from old art projects in college, cut them into proper sizes to wrap these styrofoam pieces up neatly (just eno

Handmade phone sock from real sock

Image
I've been looking for a protective solution for my phone and as usual, I hate to make new purchase and contribute to encouraging unnecessary productivity. So I turned to my stash of clutter for help and found a pair of in-flight socks I got when I last flew with BA. Never worn them, and never will. I took one of them, turned it inside out, and folded the side outward and downward to make it into half the length and double layer. Secure the bottom loose openings by sewing some beads (from my existing bead collection), also serves as decoration :-) Found some thin ribbons (these are cut from clothes that came with ribbons sewn under the shoulders for hanging purposes but I don't like having them), and cut into 2 equal lengths. I tied one end to a straight hairpin and poked it through and around the top of the sock, and tied the 2 ends together when they meet. Repeat the same process by starting the first poke-through at the opposite end. Yay, new phone sock - completely free! And

What to do with disposable chopsticks and old wooden spatulas? Some new pot stands!

Image
We live in a disposable age; everything is highly disposable. Even most of the food outlets we go nowadays serve food in disposable plates and provide disposable cutlery. I love my sushi and these sushi bars are known for their disposable chopsticks. I had in the past used and disposed of many pairs of wooden and bamboo chopsticks, and am gutted about not being able to do anything about it. Up until I found my personal travel chopsticks, I have collected a bundle of the disposable ones. I used to wrap them in used paper napkin, take them home, wash and rinse them, dry them properly (I place them over my portable oven so whenever I make a roast it will dry things up thoroughly) and - store them away. One day I saw this wooden pot stand in a shop and that gave me some idea. I have some old wooden spatula that went sticky due to the built-up burnt on oil, so as usual I hogged on them for ages because I knew they would come in handy one day. I took two similar size ones and cut off the wid